Quantcast
Channel: stm32 – Hackaday
Viewing all 191 articles
Browse latest View live

Reverse engineering ST-Link/V2 firmware

$
0
0

reverse-engineering-stlink-v2

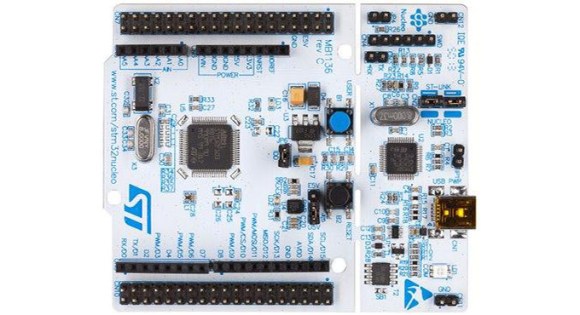
The chip seen just above the center of this image is an ARM Cortex-M3. It provides the ability to interface and program the main chip on the STM32F3 Discovery board. The protocol used is the ST-Link/V2 which has become the standard for ST Microelectronics development boards. The thing is, that big ARM chip near the bottom of the image has multiple UARTs and bridging a couple of solder points will connect it to the ST-Link hardware. [Taylor Killian] wanted to figure out if there is built-in firmware support to make this a USB-to-serial converter and his path to the solution involved reverse engineering the ST-Link/V2 firmware.

The first part of the challenge was to get his hands on a firmware image. When you download the firmware update package the image is not included as a discrete file. Instead he had to sniff the USB traffic during a firmware update. He managed to isolate the file and chase down the encryption technique which is being used. It’s a fun read to see how he did this, and we’re looking forward to learning what he can accomplish now that’s got the goods he was after.


Filed under: Microcontrollers

Adding an LCD screen terminal for TP-Link routers

$
0
0

lcd-screen-terminal-for-tplink-linux-router

Routers running embedded Linux offer quite a bit of power depending on what you need to do. To extend the usefulness of his TP-Link router [Roman] built a rig that adds an LCD screen to display the terminal. But it ended up being quite a bit more powerful than that.

The first portion of the project was to build a USB video card for the display. [Roman] went with an STM32 development board which resolves the USB device end with the QVGA screen driver (translated). This seems like it would be the lion’s share of the project, but he still needed a driver on the router to interface with the device. This thrust him into the world of USB-class drivers (translated). It even included building graphics support into the kernel of OpenWRT. The final piece of the puzzle was to write a frame buffer (translated) that would help regulate the output to the screen. The result works so well he is even able to play games using ScummVM. See for yourself in the clip after the break.


Filed under: linux hacks, video hacks

A better template for your STM32 F3 dev board

$
0
0

If you’ve picked up one of those really cool STM32 ARM dev boards, you’ve probably poked around looking for a good toolchain. No fear, then, because [Matt] has your back. He put together a template for the ARM Cortex-M4 powered STM32 board.

[Matt] had been using a template for the STM32 F4 we’d covered before, but found the implementation a bit lacking. Wanting to exploit the functionality of his fancy STM32 F3 board, [Matt] took the F0 template whipped up by our very own [Mike S] and got it to work with the newer, fancier dev board.

There are a few bonuses to using [Matt]‘s template; the ARM chip in the F3 Discovery board has a hardware floating-point unit that is inaccessible using the Code Sourcery G++: Lite Edition toolchain. [Matt]‘s use of gcc-arm-embedded allows access to the hardware FPU, a great benefit for a great board.


Filed under: ARM, Software Development

Impressive dev boards for your STM32 dev boards

$
0
0

stm32-discovery-breakout-boards

It seems there are a lot of people who have the same complaint about the STM32 Discovery boards; it can be difficult to add external hardware to them. Don’t get us wrong, we appreciate all of the pins being broken out (as opposed to the Stellaris Launchpad which we think has too few available). Here’s [Scot Kornak's] solution to the problem. He created three different baseboards which the STM32 Discovery plugs into. Each is for a different model of dev board: the VL, F3, and F4. But he also thinks the baseboard we saw in this other project is a good choice for an F4 solution.

These large PCB add-ons bring functionality in two different ways. The first is by using expandable ports for drop in modules like serial communications connectors or Analog/SPI/I2C modules. For us, the second method is the most desirable. He routes each GPIO port to a 2×8 header and uses IDC cables (rainbow cable in these images) to connect them to a breadboard. Seeing this makes us wish STM had used discreet clusters of 16 pins instead of those super long dual pin headers.


Filed under: ARM

EEPROM hack unlocks crippled features in Agilent multimeter and LCR meter

$
0
0

u1241a-agilent-hack

[Gnif] was doing what any good hacker does… poking around the insides of one of his tools to see how it works. While in there, he discovered that an EEPROM hack could make the Agilent U1241A function like the U1242A.

If you’re into this kind of thing the Rigol 1052e hack should have already popped to mind. That was a firmware crippled device that, when unlocked, made the cheaper model behave the same ways as it’s $400 more expensive sibling. This doesn’t have quite the same impact, as the price difference is somewhere between $20-$100. Still, this stuff is just cool, right?

A few posts down in the thread linked above [Gnif] shares the story of how he found the hack. After shorting the i2c lines of the EEPROM while powering up the meter he was able to see that the device initializes a lot of its values to 0xFF when it can’t find the stored data. The next step was to use an STM32 board to dump the EEPROM contents. With the backup file stored safely he started changing values and reflashing the chip. Through this process he discovered that switching one byte from 0×01 to 0×02 enabled the higher model’s features. It also works for upgrading the U1732C to the U1733C feature set.


Filed under: tool hacks

Making it Easier to Build Firmware

$
0
0

OSHW Logo

Most microcontroller manufacturers give you some kind of free development toolchain or IDE with their silicon products. Often it’s crippled, closed source, and a large download. This is pretty inconvenient when you want to have firmware that’s easy to build and distribute. I’ve found many of these toolchains to be annoying to use, and requiring closed source software to build open source firmware seems less than desirable.

It’s possible to build code for most microcontrollers using command line tools. You’ll need a compiler, the device manufacturer’s libraries and header files, and some method of flashing the device. A lot of these tools are open source, which lets you have an open source toolchain that builds your project.

Setting up these tools can be a bit tricky, so I’m building a set of templates to make it easier. Each template has instructions on setting up the toolchain, a Makefile to build the firmware, and sample code to get up and running quickly. It’s all public domain, so you can use it for whatever you’d like.

Currently there’s support for AVR, MSP430, Stellaris ARM, and STM32L1. More devices are in the works, and suggestions are welcome. Hopefully this helps people get started building firmware that’s easy to build and distribute with projects.


Filed under: Microcontrollers, rants

[FlorianH] shows off MinimaBL, the next generation of his quadcopter project

$
0
0

minimabl

[FlorianH] has all kinds of new features to show off with this generation of his quadcopter project. Just about everything has seen an upgrade or some other kind of tweak since we looked in on the last version of the aircraft.

You’ll find some outdoor flight demo clips after the break. Right off the bat we’re impressed at the rock solid stability of the quadrotor while in flight. Even indoors the last version had a hint of a wobble as the control loop calculated stabilization. Here he borrowed some code from the open source Aeroquad project which helps account for this improvement. But the hardware choices lend a hand too. He moved from an ATmega32 up to an STM32F405RG processor. That’s an ARM chip which he programs using one of STM’s Discovery boards. The motors have all been upgraded as well (if you listen in the demo videos for both models you can hear a difference) and he redesigned the frame, which combines carbon tube with 3D printed parts to keep it light yet strong. The upgrade is every bit as impressive as the original build!


Filed under: robots hacks, wireless hacks

Taming STM32 Discovery boards for regular use

$
0
0

taming-discovery-boards

We think [Karl Lunt] has a point when he says that the STM32 Discovery Boards are cool and inexpensive, yet not hobby friendly. But it’s nothing that a little big of creativity can’t solve. Above are pictured three of the hacks he used to tame the Discovery boards.

The first is the addition of a microSD card adapter. He soldered wirewrap wire to each of the contacts on the adapter. He recommends a low iron setting to make sure you don’t melt the plastic adapter housing. He then used double stick foam tape to adhere it to the bottom of the dev board. The other ends of the wire are wrapped around the appropriate pins on the dual-row pin header. Similarly, the UART3 connections are broken out from the pin headers to that white quick connect socket. This lets him access serial data without having to solve the USB issues that were vexing him.

Finally, he made his own daughter board to break out the dual row headers into screw terminals. We’ve been hit with problems interfacing hardware with the board’s native connections — jumpering to IDE cables just never worked reliably. This breakout board not only makes it simple, but organizes the pins into groups based on their alternate functions.

Do you remember seeing the hacksaw version of this Discovery board which gives you two dev boards for the price of one?


Filed under: Microcontrollers, tool hacks

The Bitbox Console: an Open Source Gaming Rig

$
0
0

Bitbox Console

A simple resistive DAC is all you need to drive a VGA display. Combining that with an on-chip DAC for audio, the STM32F405RGT6 looks like a good choice for a DIY game console. [Makapuf's] Bitbox console is a single chip gaming machine based on the STM32 ARM processor.

We’ve seen some DIY consoles in the past. The Uzebox is a popular 8 bit open source game system, and [makapuf] was inspired by its design. His console’s use of a more powerful 32 bit processor will allow for more complex games. It will also provide more colors and higher quality audio.

One of the keys of the Uzebox’s success is the development tools around it. There’s a full emulator which allows for debugging with GDB. [Makapuf] has already built an SDL based emulator, and can debug the target remotely using GDB. This will certainly speed up game development.

After the break, check out a demo of the first game for the Bitbox: JUMP. Also be sure to read through [makapuf]‘s blog for detailed information on the build.


Filed under: ARM, home entertainment hacks

Reverse Engineering an LG Cell Phone Display

$
0
0

andy-cell

[Andy] has done a great job reverse engineering the LG KF700 cell phone display. LG’s KF700 is a 2008 era cell phone — that’s about 300 years old in cell phone years. The phone was somewhat novel in that it used a 3” diagonal 2:1 480×240 widescreen format. While the phone itself may be a memory, its screen lives on through the magic of Ebay.

Obtaining the LCD is the easy part – the hard part is figuring out how to interface to it. LG is very helpful in that regard by publishing detailed service manuals and schematics on their cell phones. We’re not sure if these manuals are supposed to be public domain, but Google is your friend here. With the help of the service manual, [Andy] was able to determine the LCD has an on board controller (Himax HX8352), making it much easier to interface to. He was also able to find out information about the LCD connector pin out, and even a connector part number.

Connectors in hand, [Andy] set about building a board. His software of choice is Protel, former name of the software we now know as Atlium designer. Knowing that most people aren’t running the same software he is, [Andy] gives plenty of information on creating a footprint for the tiny LCD connector.

The last part of this hack was the software. [Andy] is fond of the STM32 series, so he started with drivers for those processors. The final product is quite impressive. [Andy] also ported his driver to the Arduino Mega, however a 5 volt to 3.3 volt adapter must be used between the Arduino and the LCD.  Software for both drivers are available on [Andy's] github.


Filed under: Cellphone Hacks

Fail of the Week: Photography Turntable

$
0
0

fotw-spinning-platform

Turntable photography has seen a rise in popularity driven by online shopping. If you can’t hold it in your hand at least you can see what it looks like from all angles. From the still image, [Petteri Aimonen's] roll-your-own turntable looks great. It’s completely enclosed and has a very nice paint job. But when you see it in action it appears to suffer from a stutter.

He isn’t just using this to capture continuously rotating video, but planned to have it rotate a set amount and then pause while an image is snapped. He used an STM32 microcontroller to drive a brushless motor which he pulled from a hard drive. It totally works, but the nature of the hard drive motor thwarted his original plan. It’s meant to run at very high speeds with low friction. But the thing was never designed to stop on a dime. So when it is directed to turn thirty degrees, it overshoots and oscillates back and forth as shown in the video.

This oscillation would go on for more than ten seconds. But [Petteri] was able to dampen it by adding some friction to the disc. He also had to tweak the original driver design, adding flyback diodes he had forgotten to include, and dealing with some issues caused when feeding a PWM signal to the coils. There are other small defeats which also ate away at him. The paint color doesn’t match the light box he’s using, there were some issues with the battery, and at one point he broke the programming header right off of his PCB. Despite these frustrating issues we still bet it was a lot of fun to work on the project.


2013-09-05-Hackaday-Fail-tips-tileFail of the Week is a Hackaday column which runs every Wednesday. Help keep the fun rolling by writing about your past failures and sending us a link to the story – or sending in links to fail write ups you find in your Internet travels.


Filed under: digital cameras hacks, Hackaday Columns

Building a Ball-Balancing Robot

$
0
0

robotBallBalance

If you want a different kind of feedback systems challenge, ditch the Segway-style robots and build one that can balance on a ball. UFactory is a startup in Shenzhen, and this impressive little guy is a way of showing their skills applied to the classic inverted pendulum. At nearly 18 inches tall and weighing just over six pounds, the robot boasts a number of features beyond an accelerometer and gyroscope: it has both a WiFi module and a camera, and can be controlled via a homemade remote control or a Kinect.

The build uses plastic omni-directional wheels attached to 3 brushed dc motors, which attach to the base of the robot with custom-made aluminum brackets. The UFactory gang constructed the robot’s body out of three acrylic discs, which hold the electronics directly above the wheels. The brain seems to be an STM32 microcontroller that connects up to the motors and to the sensors.

You won’t find the code on their Instructable yet, but according to the comments they have plans to make the entire project open source. If you’re desperate for more details, the UFactory team seems willing to provide source code and other information via email. Make sure you see the video after the break, particularly the end where they demonstrate interference and carrying loads. This isn’t the first ball pendulum we’ve seen; take a trip down memory lane with the BallP ball balancing robot from 2010.


Filed under: ARM, robots hacks

Using DMA to Drive WS2812 LED Pixels

$
0
0

ws2812-dma-control

It’s pretty well known by now that the LED pixel hardware which is starting to be commonplace, both WS2811 and WS2812, needs pretty strict timing in order to address them. There are libraries out there which mean almost no work on your part, but that’s no fun. [Elia] started looking into what it takes to drive the hardware, trying out a few 8-bit micros before moving to 32-bit with the help of an STM32VL Discovery Board. The move to a beefier processor brings a lot of speed, but why bit bang everything? He came up with a way to use the PWM and DMA features of the chip to drive the LEDs.

DMA is the Direct Memory Access unit that allows you to change the values being sent to the pixel without interrupting the processor. This is done by pre-loading the data at a memory location. This buffer is automatically read by the DMA unit — its values are used to set the PWM timer compare trigger in order to send out logic values show in the diagram above.

If you do want to delve further into this topic here’s a collection of techniques for driving the WS2811.


Filed under: led hacks, Microcontrollers

Breadboard Friendly ARM Board Based on STM32F4

$
0
0

breadboard-friendly-stm32-dev-board

Umm yeah… this is more like it. The STM32F4Stamp is a project which [Frank Zhao] put together to make his ARM prototyping process more like is was back when everything came in a DIP format. As you can see, it’s just narrow enough to leave one row open on the breadboard for jumper wires.

Don’t get us wrong, we do really like STM’s own Discovery Boards for the hardware they deliver at a very low price. But the dual-row pin headers on the larger versions (all except the F0 variant) make it tricky to connect your peripherals. This is pushed to the point that a large percentage of hacks we’ve seen with the Discovery boards are actually just to make connecting external hardware easier.

You may be thinking that there’s a lot missing from this board, but we disagree. Obviously there’s still a USB port which can be used to power the board via a 3.3V regulator. But since the STM32 chips have a built-in bootloader the USB connection can also be used to flash firmware to the processor. Nice! It’s open hardware if you want roll your own. For your convenience we’ve embedded the schematic after the break, along with [Frank's] demo video.

http://www.youtube.com/watch?v=dJDpkEFYyiw

stm32f4stamp-schematic[via Dangerous Prototypes]


Filed under: ARM

Hackaday Links: January 5, 2014

$
0
0

hackaday-links-chain

While we can’t condone the actual use of this device, [Husam]‘s portable WiFi jammer is actually pretty cool. It uses a Raspberry Pi and an Aircrack-ng compatible dongle to spam the airwaves with deauth packets. The entire device is packaged in a neat box with an Arduino-controlled LCD and RGB LEDs. Check out an imgur gallery here.

You can pick up a wireless phone charger real cheap from any of the usual internet outlets, but try finding one that’s also a phone stand. [Malcolm] created his own. He used a Qi charger from DealExtreme and attached it to a 3D printed phone stand.

A while back, [John] noticed an old tube radio in an antique store. No, he didn’t replace the guts with a Raspberry Pi and an SD card full of MP3s. He just brought it back to working condition. After fixing the wiring (no ground cord on these old things), repairing the speaker cone, putting some new twine on the tuner and replacing the caps, [John] has himself a new old radio. Here’s a video of the complete refurbishment.

Here’s a Sega Master System (pretty much a Game Gear) running on an STM32 dev board. Also included are some ROMs for some classic games – Sonic the Hedgehog, Castle of Illusion, and The Lion King. If you have this STM Discovery board you can grab the emulator right here.

[Spencer] wanted a longer battery life in his iPhone, so he did what any engineering student would do: he put another battery in parallel.

Breadboarding something with an AVR or MAX232? Print out some of these stickers and make sure you get the pinouts right. Thanks, [Marius].


Filed under: Hackaday Columns, Hackaday links

STM32 Nucleo, The Mbed-Enabled, Arduino-Compatable Board

$
0
0

Nucleo

The STM32 line of microcontrollers – usually seen in the form of an ST Discovery dev board – are amazingly powerful and very popular micros seen in projects with some very hefty processing and memory requirements. Now, ST has released a great way to try out the STM32 line with the Nucleo board.

There are two really great features about these new Nucleo boards. First, they’re mbed compatable, making them a great way to get started in the ARM development world. Secondly, they have Arduino pin headers right on the board, giving you access to all your shields right out of the box.

Right now, there are four varieties of the Nucleo board based on the STM32F030, -F103, -F152, and -F401 microcontrollers. The STM32F401 is the high-powered variant, An ARM Cortex-M4 microcontroller running at 84 MHz, 512kB of Flash, and enough I/O for just about any project.

If you’d like to get your hands on one of the STM32 Nucleo boards, you can order a voucher to pick one up at Embedded World in Germany next week. Otherwise, you’re stuck ordering from Mouser or Farnell. Bonus: the high-end F401-based board is only $10 USD.


Filed under: ARM, Microcontrollers

Smart Reflow Oven is Over-Engineered

$
0
0

reflow

[Linas] reverse engineered an AMOLED HTC 800×480 screen and interfaced it with an STM32 micro-controller, along with some other components, to make a gorgeously over engineered reflow oven.

Under the hood there is a PSoC5LP PID controller to control the 800W IR heating coil and two K-type thermocouples for sensing.

The real beauty is in the relatively small STM32 chip powering the HTC AMOLED screen. The AMOLED screen is high contrast and has a wide viewing angle, giving it a clear crisp view from all front facing viewpoints. Though pushing the limits of what the STM32F429i can do, [Linas] managed to make a very nice “home-grown” user interface, complete with user configurable settings and current temperature graphs.

The user interface looks very responsive and using some clever programming, [Linas] was able to make use of the potential of the screen to provide beautiful plots and interface widgets.

[Linas] goes into quite a bit of detail about the programming involved with rendering to the screen, so be sure to check out the video after the jump.


Filed under: Microcontrollers, tool hacks

Frankenstein, The Open Source Engine Control Unit

$
0
0

20140306_state

The Engine Control Unit is a vital part of every car made in the last 40 years or so, but unlike just about every other electronic device, open source solutions just don’t exist. [Andrey] is trying to change that with rusEfi, a project that hopes to bring together hardware, software, and engines in one easy to use package. He’s even designed Frankenstein, a full ECU ‘shield’ for the STM32F4 Discovery dev board.

This isn’t the first time we’ve seen [Andrey]‘s adventures in building an ECU. An earlier board was also powered by the STM32F4 Discovery, and he actually drove his 96 Ford Aspire around using this homebrew ECU. It was only firing on two cylinders, but that was only a loose solder connection.

Of course building an ECU from scratch is worthless without the proper firmware that balances and engine’s fuel economy and performance. This sort of testing must be done empirically and [Andrey] has a Kickstarter going for the development of this firmware and some dyno time. No rewards, but it’s worth chipping in a buck or two. I did.

Videos below.


Filed under: Engine Hacks, transportation hacks

Sprite Graphics Accelerator on an FPGA

$
0
0

A demo running on a FPGA sprite accelerator

Graphics accelerators move operations to hardware, where they can be executed much faster. This is what allows your Raspberry Pi to display high definition video decently. [Andy]‘s latest build is a 2D sprite engine, featuring hardware accelerated graphics on an FPGA.

In the simplest mode, the sprite engine just passes commands through to the LCD. This allows for basic control. The fun part sprite mode, which allows for sprites to be loaded onto the FPGA. At that point, you can show, hide, and move the sprite. By overlapping many sprites, you something like the demo shown above.

The FPGA is from Xilinx, and uses their Block RAM IP to store the state of the sprites. The actual sprite data is contained on a 128 Mb external flash chip, since they require significant space.

The game logic runs on a STM32 Cortex M4 microcontroller which communicates with the FPGA and orders the sprites around. The FPGA then deals with generating frames and sending them to the LCD screen, freeing up the microcontroller.

If you’re wondering about the LCD itself, it’s 3.2″, 640 x 360, and taken from a Ericsson U5 Vivaz cellphone. [Andy] has a detailed writeup on reverse engineering it. After the break, he gives us a video overview of the whole system.


Filed under: video hacks

THP Semifinalist: NoteOn Smartpen

$
0
0

PCB of the NoteOn Smartpen showing components

There are a ton of apps out there for taking notes and recording ideas, but sometimes the humble pen is best. However, if you have the tendency to lose, crumple, or spill caffeinated beverages on your pen and paper notes, having a digital copy is quite nice.

The NoteOn Smartpen by [Nick] aims to digitize your writing on the fly while behaving like a normal pen. It does this by using the ST LSM9DS0TR: a 9-axis inertial measurement unit (IMU). These inertial measurements are processed by a STM32 Cortex M4F processor and stored on the internal flash memory.

To retrieve your notes, the Nordic nRF8001 Bluetooth Low Energy radio pairs the MCU with a phone or computer. The USB port is only used to charge the device, and the user interface is a single button and LED.

The major hardware challenge of this device is packaging it in something as small as a pen. Impressively, the board is a cheap 2 layer PCB from OSHPark. The assembled device has a 10 mm diameter, which is similar to that of ‘dumb’ pens.

The NoteOn doesn’t require special paper, and relies only on inertial measurements to reconstruct writing. With the hardware working, [Nick] is now tackling the firmware that will make the device usable.

SpaceWrencherThe project featured in this post is a quarterfinalist in The Hackaday Prize.


Filed under: The Hackaday Prize
Viewing all 191 articles
Browse latest View live


<script src="https://jsc.adskeeper.com/r/s/rssing.com.1596347.js" async> </script>